
How to Change Nameservers of Domain for SiteGround
You signed up with SiteGround and feature already installed WordPress on it.
However now you've to search out a way to transfer or “element” the domain name that you simply had up to now bought from a domain supplier (like NameCheap, GoDaddy, Google Domain Names etc.) so that you can use it with your new webhosting.
on this information I’ll display you step-by-step on how you can get your area running together with your SiteGround plan and setup/amendment title-servers of your area regardless of the place you’ve purchased your domain from.
Permit’s dive right in.
how you can Change Nameservers of Domain for Siteground: FIVE Steps
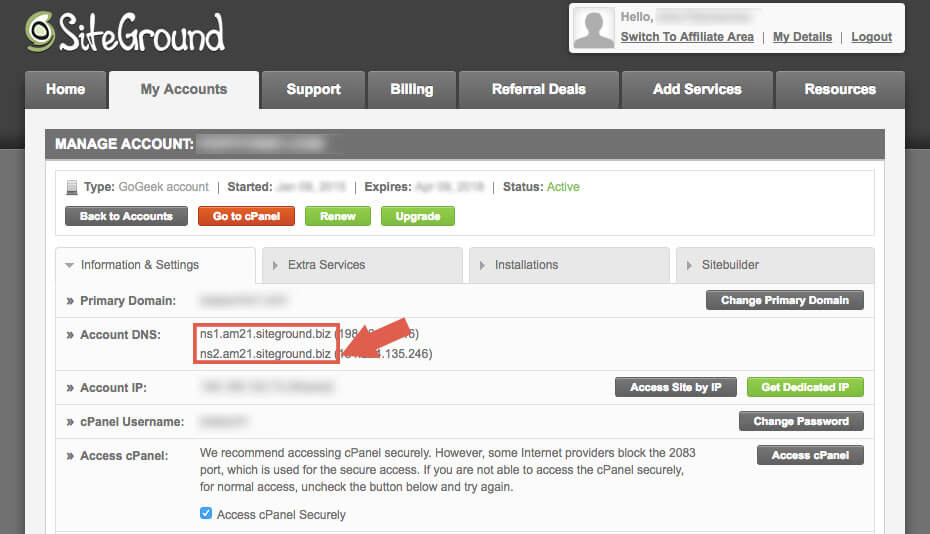
Step 1: Leap into your Person House (that's basically the House web page) and then click the My Accounts tab. You Must to find that it is proper subsequent to the Home tab.

Step 2: Great! You’ll be delivered to your Take Care Of Account web page. Now what you do is click the Data & Settings tab that is to the a long way left hand aspect.

Step THREE: Now scroll down to the Account DNS segment and consider of the 2 addresses that are there. they're called nameservers — it will glance one thing like ns1.m16.siteground.biz. You’ll need these in a minute so keep this tab open for your browser.
Step 4: Subsequent, google the domain supplier that you simply purchased the domain from. a few of probably the most in style area suppliers are NameCheap, Google Domains, GoDaddy, 101Domains, Gandi and the like. Underneath I Will Be Able To information you with the stairs for the 5 given domain suppliers that I just discussed. in case your area supplier is not on this checklist, please comment down beneath or look for the steps that are supplied by them on their web page.
If you purchased your area from NameCheap
Step 1: Check In on your Namecheap account and then make a choice Domain Listing from the left hand sidebar. Then click on Handle proper next on your domain title that you had bought.

Step 2: Now search for the Nameservers section down under and select Custom DNS. Click on the little green test signal to save lots of changes.
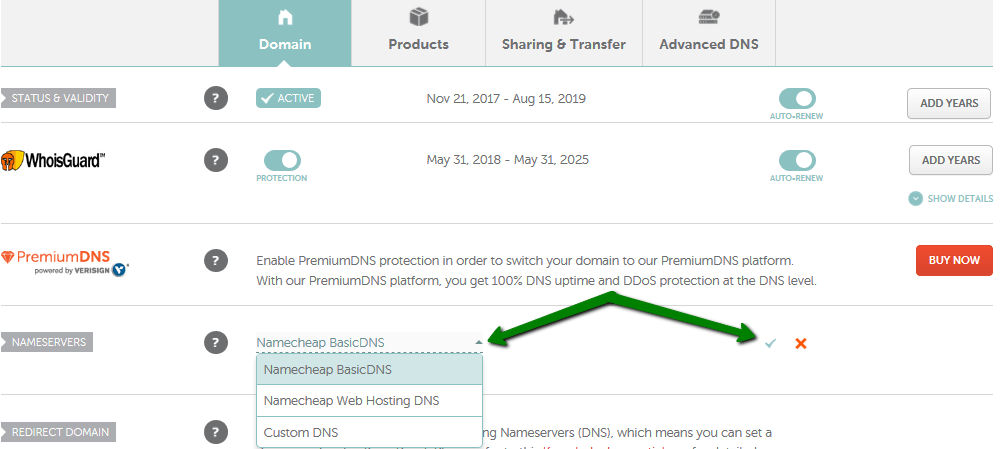
Step 3: In The End, all you may have to do is simply copy and paste both the addresses/nameservers which can be for your SiteGround (those that I told you to keep note of in Step 3 above).

Ensure to avoid wasting your adjustments by way of hitting that inexperienced check sign and you’re done!
If you purchased your domain from Google Domain Names
Step 1: Login to your Google Domains account.
Step 2: Now proper next to the area that you had purchased you wish to see a bit of DNS icon. click on this DNS icon.

Step THREE: Subsequent you will be dropped at the Title servers page. Over right here click the choice to Use customized name servers.

Step 4: After All, all you may have to do is just copy and paste both the addresses/nameservers which can be for your SiteGround (the ones that I advised you to maintain be aware of in Step THREE above)
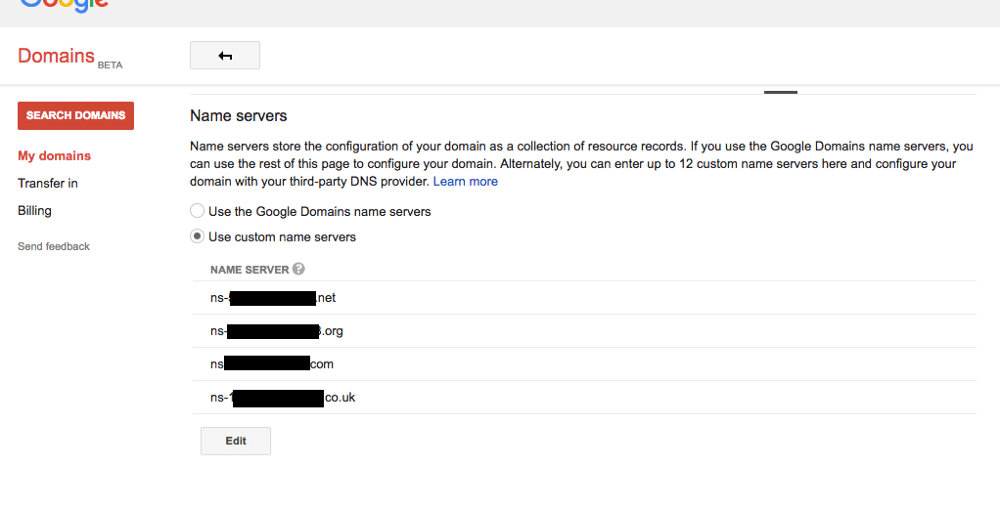
Hit the blue Store button and you’re performed!
If you purchased your domain from GoDaddy
Step 1: Cross in advance log into your GoDaddy account after which click on your profile icon at the very best. Then from the dropdown menu click Take Care Of Domain Names.

Step 2: Great! Now you should in finding your bought area right here. So what you do is click on the little arrow right next to the cog icon after which from the drop down menu click on Handle DNS.

Step THREE: You’re virtually done! Now scroll all the way down to the Nameservers phase and click on the Change button.

Step FOUR: From the drop down checklist you'll be able to choose your new nameserver kind which in this case we wish to select Custom in order that we will be able to the SiteGround’s nameservers. Simply replica and paste each the addresses/nameservers which can be to your SiteGround (those that I told you to maintain word of in Step THREE above)
Hit Retailer and you’re done!
If you bought your domain from Gandi
You'll discuss with steps provided right here.
If you bought If you purchased your area from 101Domains
You'll confer with steps supplied right here.
Step 5: When You’ve introduced either one of your SiteGround nameservers into your area supplier’s settings, it can take anyplace from an hour to 24 hours (depending on the domain provider) for the adjustments to take impact.
That’s it!


Hiç yorum yok